Insert
The insert command has these sub-selections:
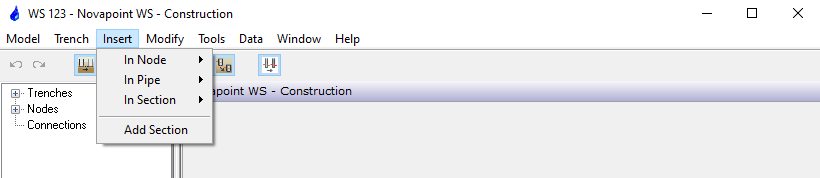
In node >
Connection
Use this function for inserting connections, e.g. manholes, pipe bends, valves, pumping stations, etc. in a node.
The function is run from the following location:
Menu: Novapoint WS Construction > Insert > In Node > Connection
The command prompts for:
Pick a Node :
Click the node in which you want to insert a connection
Ok ?
Pick a Node :
Confirm by pressing the right mouse button or Enter on the keyboard. If the selection should be wrong, another node can be selected immediately, without confirming the first selection.
The dialogue box Select a Connection appears.
Select the desired connection
Position (x,y,z) < -28361.69,243223.03,0.00> :
Click the insertion point for connection. Use AutoCAD's Object Snap for the exact location of the connection.
The function may also be run from the shortcut menu for the node in the horizontal window. Place the crosshair upon the node in which the connection is to be inserted, press the right mouse button, and select “Insert Connection” from the menu.
The dialogue box Select a Connection appears.
Select the desired connection
Position (x,y,z) < -28361.69,243223.03,0.00> :
Click the desired insertion point for the connection. You may use AutoCAD's Object Snap for the exact location.
In Pipe >
Connection
Use this function for inserting connections, e.g. manholes, pipe bends, valves, pumping stations, etc. in a pipe.
Run the function from the following location:
Menu: Novapoint WS Construction > Insert > In Pipe > Connection
The command prompts for:
Pick a Pipe :
Click the pipe in which the connection is to be inserted
Ok ?
Pick a Pipe :
Confirm by pressing the right mouse button or Enter on the keyboard. If the selection should be wrong, another pipe can be selected immediately, without confirming the first selection.
The dialogue box Select a Connection appears.
Select the desired connection
Position (x,y,z) < -28361.69,243223.03,0.00> :
Click the insertion point for connection. Use AutoCAD's Object Snap for the exact location.
The function may also be run from the shortcut menu for pipe both in the horizontal and vertical windows. Place the crosshair upon the pipe in which the connection is to be inserted and select “Insert > Connection” from the menu, (select “Insert Connection” in the Vertical window).
The dialogue box Select a Connection appears.
Select the desired connection in the horizontal window:
Position (x,y,z) < -28361.69,243223.03,0.00> :
Click the insertion point for the connection. Use AutoCAD's
Object Snap for the exact location.
Select the desired connection
Vertex
Use this function for inserting vertexes in a pipe. There are three types of vertex: Horizontal, vertical, and a combination of both.
Run the function from the following location:
Menu: Novapoint WS Construction > Insert > In Pipe > Vertex
The command prompts for:
Pick a Pipe :
Click the pipe to which the vertex is to be inserted
Ok ?
Pick a Pipe :
Confirm by pressing the right mouse button or “Enter” on the keyboard. If the selection should be wrong, another pipe can be selected immediately, without confirming the first selection.
Click the pipe and observe that a vertex has been inserted into the pipe. Notice that the vertex is inserted at the very point of the pipe you click to select it.
The function may also be run from the shortcut menu for pipe in the plan window. Place the crosshair in the point of the pipe where the vertex is to be inserted, press the right mouse button, and select “Insert > Vertex” from the menu.
Click the pipe to see that the pipe has got a vertex in the point where you clicked it.
In section >
Node
Use this function for inserting nodes into a trench section.
Run the function from the following location:
Menu: Novapoint WS Construction > Insert > In Section > Node
The command prompts for:
Pick a Pipe :
Click a pipe in the section in which you want to insert a node
Ok ?
Pick a Pipe :
Confirm by pressing the right mouse button or Enter on the keyboard. If the selection should be wrong, a pipe in another section may be selected, without confirming the first selection.
Position (x,y,z) < -28356.58,243191.26,0.00> :
Click the insertion point for node. You may use AutoCAD's Object Snap for the exact location.
The function may also be run from the shortcut menu for pipe, both in the horizontal and vertical window. Place the crosshair upon a pipe in the section in which the node is to be inserted and select “Insert > Node” under “Trace Section” in the menu, (select “Insert Node” in the Vertical window).
Pipe
Use this function for inserting pipes into a trench section.
Run the function from the following location:
Menu: Novapoint WS Construction > Insert > In Section > Pipe
The command prompts for:
Pick a Pipe :
Click a pipe in the section in which the pipe is to be inserted.
Ok ?
Pick a Pipe :
Confirm by pressing the right mouse button or Enter on the keyboard. If the selection should be wrong, a pipe in another section may be selected, without confirming the first selection.
Position (x,y,z) < -28356.86,243193.65,0.00> : *Cancel*
Click in the drawing on the side of the section the pipe is to be inserted. The program inserts a pipe parallel to the current trace section at the very point you click.
The function may also be run from the shortcut menu for pipe in the horizontal window. Place the crosshair upon a pipe in the section in which the node is to be inserted and select “Insert > Node” under “Trace Section” in the menu.
Position (x,y,z) < -28356.86,243193.65,0.00> : *Cancel*
Click in the graphics on the side of the section the pipe is to be added. The program adds a pipe parallel to the section in the point you click in the graphics.
Later you have to edit the pipe to the desired type, dimension, and class in the construction dialogue box.
Add section
Use this function for adding a trace section to an existing trench.
Run the function from the following location:
Menu: Novapoint WS Construction > Insert > Add Section
The command prompts for:
Pick a node :
Click the node from which the section is to be added.
Ok ?
Pick a node:
Confirm by pressing the right mouse button or “Enter” on the keyboard. If the selection should be wrong, another node can be selected immediately, without confirming the first selection.
Click in the drawing where you want the new node to be located
New node < -28232.72,243284.24,193.54> : *Cancel*
The dialogue box Select Cross Section appears. Select the desired cross-section and confirm by clicking OK.
The function may also be run from the shortcut menu for the node. Place the crosshair upon the node from which the section is to be added and select “Add Section” from the menu.
The command prompts for:
New node < -28184.19,243325.73,186.53> : *Cancel*
Click in the drawing where you want the new node to be located
The dialogue box Select Cross Section appears. Select the desired cross-section and confirm by clicking OK.
The function can only be executed from the first or the last node in the trench.